Notes
Random technical essays
- Useful Tools
- Flutter change app icon
- Documentation
- Winston logging to OpenObserve
- Shell script to setup a new VPS
- Gmail SMTP with app passwords
- Ubuntu, NGINX, PHP, SQLite
Useful Tools
Brave Web Browser : Refreshingly clean interface. Feels fast and light.
scrcpy : Mirror your Android phone to Ubuntu. Useful for mobile app demos. Easy to setup if adb is already running.
ClearURLs : Firefox extension. Removes all tracking information from browser URLs.
Pomotroid : Pomodoro timer desktop app.
Flutter change app icon
- Go to https://icon.kitchen and design your icon. Select Circle shape. Download and unzip. In the mipmap-xxxhdpi directory under android rename the largest file to icon.png. Then copy this file to the flutter app images directory.
- Under dev_dependencies in pubspec.yaml, add the following:
flutter_launcher_icons: ^0.13.1 flutter_icons: android: 'launcher_icon' ios: true image_path: 'images/icon.png' - Run the following commands:
flutter pub get flutter pub run flutter_launcher_icons:main - Run the app and verify that the new icon is displayed.
Documentation
A key factor of any successful business, documentation is often overlooked. Documentation requires regular effort else it quickly stagnates, becomes outdated and irrelevant.
A good documentation system can make all the difference since it revolves around the primary asset of any business - information. Recording this information, making it easy to reference or update is the key to a successful documentation system. The scope of documentation also includes popular formats such as wikis and blogs.
In this essay we discuss common pitfalls, requirements of a good documentation system and evaluation of available solutions.
Common Pitfalls
- Multiple document repositories : There needs to be only one central document repository that is well known and advertised and easily discoverable. This will hold the entire documents. The moment documents can be either here or there, it leads to confusion and hesitancy to use the system.
- Complex system : The documentation system itself should be simple to use and as friction-less as possible. A complex system involving many steps will be a deterrent. A simple and quick system is a key to ensure regular usage.
Requirements
- Self-hosted : While clouds offer a lot of convenience, information is probably better kept closely controlled.
- WYSIWYG editor : Markdown has its advantages but WYSIWYG is simpler to use.
- Support common use-cases : Specially for technical documents, easy lists and code-blocks are essential. So is adding images to documents.
- Information display : The display of information should be flexible. Pinning of key information areas and chronological display of new material. A predictable hierarchy is useful.
Solutions
- Ghost : Needs some configuration to get the desired look and feel. Crisp app! The biggest drawback I faced was easily adding code-blocks to lists. It can be done but involves a number of steps.
- Wiki.js : Faced the same problem as Ghost. Slightly less crisp.
- WriteFreely : Excellent for plain text but documents require a little more. For that we need to use markdown.
- BookStack : Settled for this. Excellent editor and information display. Multiple and flexible information hierarchies. Great permission system. You are reading this essay in BookStack!
Winston logging to OpenObserve
Centralized logging for Node.js apps.
- Install OpenObserve. Installation is simply downloading and unzipping the single binary. OpenObserve runs externally by default with no option to change this behavior, so you may need a firewall to restrict the access. I used ufw.
- Create a 'data' directory in the same location as the OpenObserve binary. Start OpenObserve:
ZO_ROOT_USER_EMAIL="<email>" ZO_ROOT_USER_PASSWORD="<password>" ZO_DATA_DIR="$PWD/data" ./openobserve > /dev/null 2>&1 & - Add winston as a dependency to your Node.js app.
- Create logger.js:
import winston, {transports} from "winston"; const options = { level: 'debug', host: 'localhost', port: '5080', path: '/api/<organization>/<stream>/_json', auth: { username: '<email>', password: '<password>', }, ssl: false, batch: true, batchInterval: 5000, batchCount: 10, }; export const log = winston.createLogger({ transports: new transports.Http(options), exceptionHandlers: new transports.Http(options), exitOnError: false }) - Import and use the logger in the application:
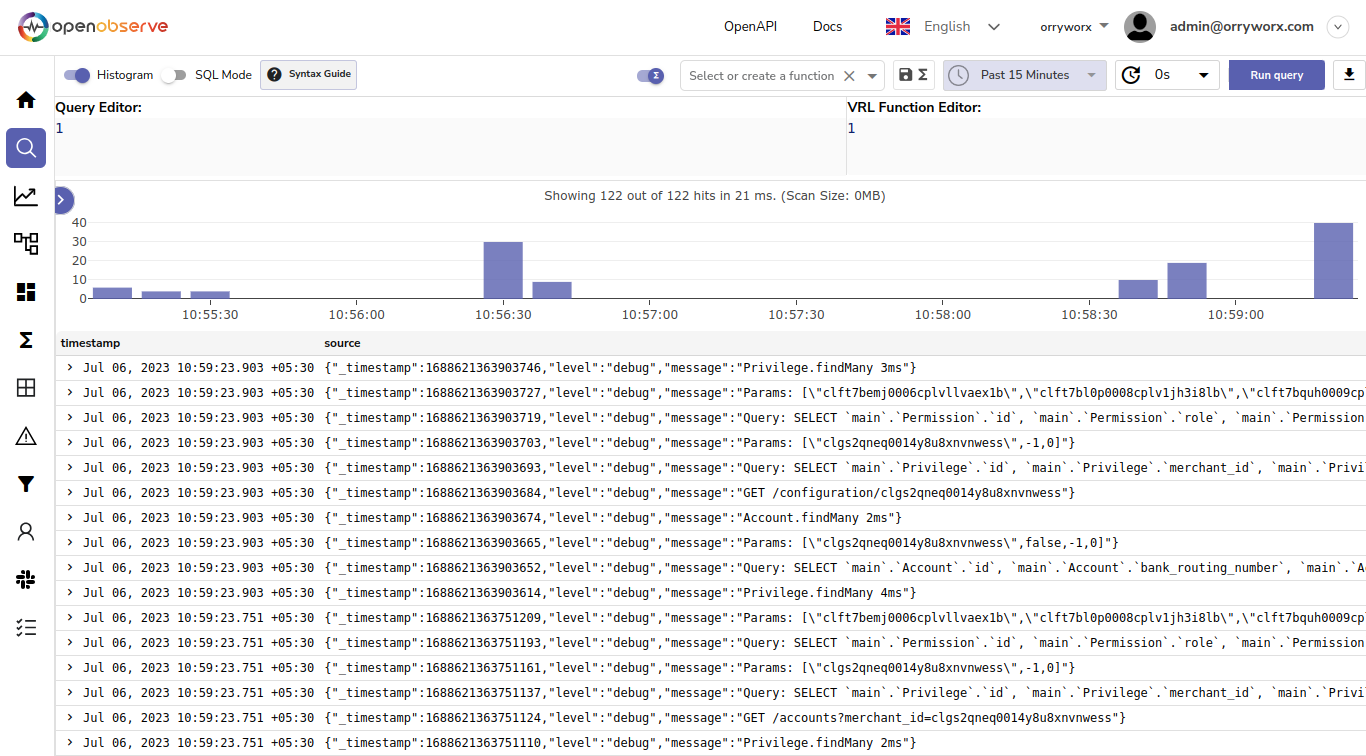
import {log} from "$lib/logger.js"; export async function handle({ event, resolve }) { log.debug(event.request.method + ' ' + event.url.pathname + event.url.search); ... - Run the application and view the logs in OpenObserve:

Shell script to setup a new VPS
The shell script below can be used to setup a new VPS running Ubuntu. It performs the following actions:
- Create a new ssh username and password.
- Disables root login.
- Disables swap.
- Installs Docker.
- Creates a few alias commands for the user.
#!/bin/sh

###################################
####### EDIT THIS SECTION #########
USERNAME="<enter username>"
PASSWORD="<enter secure password or see below to auto-generate>"
###################################

PASSWD="head /dev/urandom | tr -dc A-Za-z0-9 | head -c 16 ; echo ''"
#Uncomment line below to set an auto-generated password. The password will be displayed at the end of this process.
PASSWORD=$(eval "$PASSWD")

echo "USERNAME: "$USERNAME
echo "PASSWORD: "$PASSWORD

adduser --disabled-password --gecos "" $USERNAME && echo "$USERNAME:$PASSWORD" | chpasswd && echo "$USERNAME ALL=(ALL) NOPASSWD:ALL" > /etc/sudoers.d/$USERNAME && sed -i 's/PermitRootLogin yes/PermitRootLogin no/g' /etc/ssh/sshd_config && service sshd restart

swapoff -a
sed -i '/swapfile/d' /etc/fstab

apt update -y && apt upgrade -y && apt install -y vim sudo net-tools apt-transport-https ca-certificates software-properties-common docker.io && usermod -aG docker $USERNAME && systemctl start docker &&  systemctl enable docker

cat <<EOT >> /home/$USERNAME/.bashrc

export HISTSIZE=
export HISTFILESIZE=

bind '"\e[A":history-search-backward'
bind '"\e[B":history-search-forward'

alias di='docker images'
alias dc='docker ps -a'
alias dv='docker volume ls'
alias dl='docker container logs -f'
alias up='docker-compose up -d'
alias dn='docker-compose down'
alias lg='docker-compose logs -f'

alias gs='git status'
alias gp='git pull && gs'
alias glf='git log -p'
alias gl='git log --graph --pretty=oneline --abbrev-commit'
alias gd='git diff'
alias gcm='git checkout master && gs'
alias gcd='git checkout develop && gs'
alias gcp='git checkout production && gs'
alias gc.='git checkout . && gs'

alias vb='vim ~/.bashrc'
alias vh='sudo vim /etc/hosts'
alias sb='source ~/.bashrc'

alias f='free -m'
alias u='uptime'
alias n='sudo netstat -punta | grep LISTEN'
alias i='ifconfig'
alias j='jobs -l'
alias l='ls -falh'
alias d='df -h'
alias k='sudo kill -9'
alias s='du -sh * | sort -h'
alias t='ls -t -1'
alias h='history | grep'
alias p='ps -ef | grep'
alias kj='k $(j | awk {print $2})'

EOT

echo "USERNAME: "$USERNAME
echo "PASSWORD: "$PASSWORD

init 6
Gmail SMTP with app passwords
We can use a regular Gmail account for sending a limited number of SMTP emails daily. This is sufficient for small apps or testing.
This can be setup to use a separate, generated app password instead of your regular email password, which offers better security as the regular email password is not revealed and a user cannot login to the email account using the app password.
Note that while this usually works in local testing, sometimes it may not. In such case you may need to test from an actual server.
- In Gmail click on the Google button then Manage your Google Account.
- Click on Security in the left nav.
- Under How you sign in to Google click on 2-Step Verification. You will need to enable 2-Step Verification to continue.
- Once enabled scroll to the end of this page to the App passwords section.
- Click on App passwords, enter a name for the app and create a new app password.
- Copy the generated app password. Use this in your SMTP settings as the SMTP password.
SMTP_HOST="smtp.gmail.com"
SMTP_PORT=587
SMTP_USER="dogesh@gmail.com"
SMTP_PASS="nqlxgwmtcaosgiyp"
Ubuntu, NGINX, PHP, SQLite
Install NGINX:
sudo apt-get update -y
sudo apt-get upgrade -y
sudo apt-get install nginx -y
Verify NGINX is running:
sudo systemctl status nginx

● nginx.service - A high performance web server and a reverse proxy server
     Loaded: loaded (/lib/systemd/system/nginx.service; enabled; vendor preset: enabled)
     Active: active (running)
If you need to change the default port of NGINX or run the service only on localhost:
sudo vim /etc/nginx/sites-enabled/default

server {
        listen 127.0.0.1:8000 default_server;
        # listen [::]:80 default_server;
        port_in_redirect off;
...

sudo nginx -t
sudo systemctl restart nginx
Set port_in_redirect off; to prevent the port from being added to the URL after a redirect.
Install PHP:
sudo apt-get install php-fpm -yVerify PHP is running:
sudo systemctl status php8.3-fpm

● php8.3-fpm.service - The PHP 8.3 FastCGI Process Manager
     Loaded: loaded (/lib/systemd/system/php8.3-fpm.service; enabled; vendor preset: enabled)
     Active: active (running)
Enable PHP in NGINX:
sudo vim /etc/nginx/sites-enabled/default

        # Add index.php to the list if you are using PHP
        index index.php index.html index.htm index.nginx-debian.html;

        server_name _;

        location / {
                # First attempt to serve request as file, then
                # as directory, then fall back to displaying a 404.
                try_files $uri $uri/ =404;
        }

        # pass PHP scripts to FastCGI server
        #
        location ~ \.php$ {
                include snippets/fastcgi-php.conf;
        #
        #       # With php-fpm (or other unix sockets):
                fastcgi_pass unix:/run/php/php8.3-fpm.sock;
        #       # With php-cgi (or other tcp sockets):
        #       fastcgi_pass 127.0.0.1:9000;
        }

        # deny access to .htaccess files, if Apache's document root
        # concurs with nginx's one
        #
        location ~ /\.ht {
                deny all;
        }
In the default server configuration:
- Add index.php to the index list.
- Uncomment the location php block and fastcgi_pass for php-fpm. Ensure correct PHP version.
- Uncomment block to deny access to .htaccess files.
Validate the NGINX configuration changes and restart NGINX.
Install SQLite3 libraries and restart NGINX:
sudo apt-get install php-sqlite3 sqlite3 libsqlite3-dev -yFinally change the permission of the root directory:
sudo chmod -R 777 /var/www/htmlReferences: